
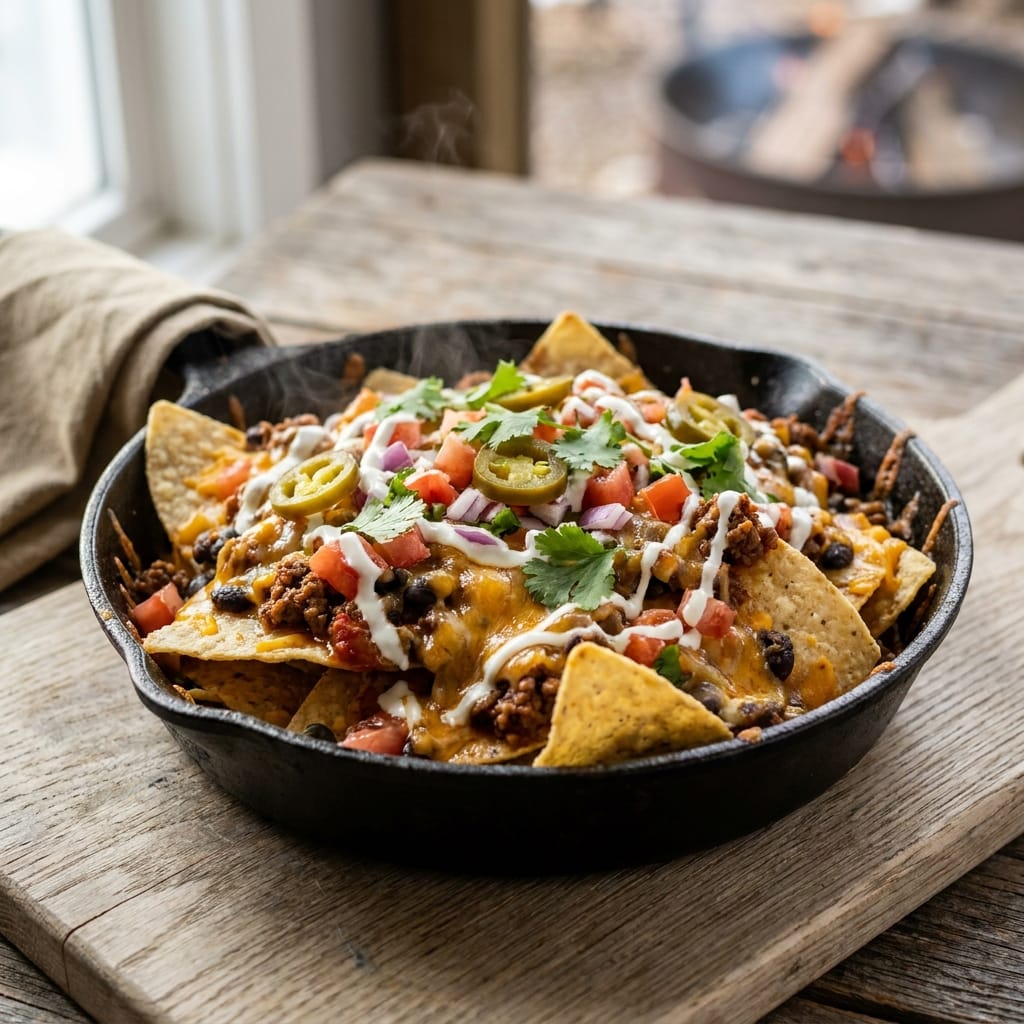
Ultimate Campfire Nachos Loaded with Cheese and Fresh Toppings
Why You’ll Love This Recipe
I have a vivid memory of my first attempt at making nachos over a campfire. I was so excited that I just dumped everything into a single foil pan and set it right on the coals. The bottom burned to a crisp while the cheese on top barely melted. It was a sad, smoky mess that my family politely tried to eat. That failure sent me on a mission to perfect the nachos cooking process over an open flame.
After many test runs in my backyard fire pit, I finally cracked the code. The secret is all in the layering and the indirect heat. You cannot just toss everything together and hope for the best. This recipe for Ultimate Campfire Nachos Loaded with Cheese and Fresh Toppings is the result of all that trial and error. It solves the biggest problem of campfire cooking: uneven heat. Every single chip gets a fair share of melted cheese and toppings, with no burnt bits.
What I love most about this dish is how it brings everyone together. There is something magical about pulling a steaming hot pan of nachos out of the fire and watching people dig in with their hands. It is messy, it is fun, and it tastes incredible. This is not a fancy meal. It is a real, satisfying, and deeply comforting dish that makes any camping trip feel special.
Ingredients
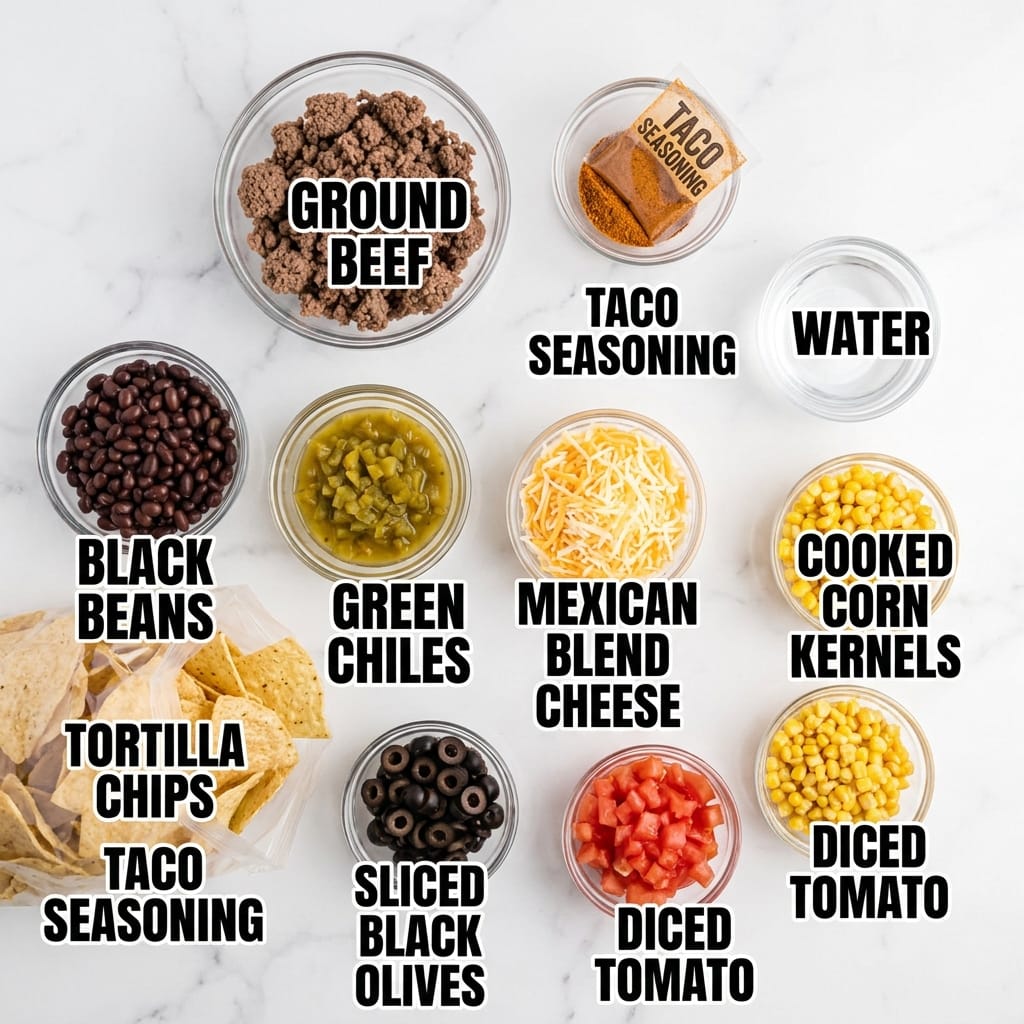
- 1 large bag (13-16 oz) of thick, sturdy tortilla chips (like Restaurant Style)
- 1 lb ground beef or ground turkey
- 1 packet (1 oz) taco seasoning
- 1/2 cup water
- 1 can (15 oz) black beans, drained and rinsed
- 1 can (4 oz) diced green chiles
- 3 cups shredded Mexican blend cheese (or a mix of cheddar and Monterey Jack)
- 1 cup cooked corn kernels (canned or frozen, thawed)
- 1/2 cup sliced black olives
- 1 large tomato, diced
- 1 medium red onion, finely diced
- 1 cup fresh cilantro, roughly chopped
- 1 large jalapeno, thinly sliced (seeds removed for less heat)
- 1/2 cup sour cream (for serving)
- 1 recipe of my Best Watermelon Feta Salad (for a refreshing side)
Step-by-Step Directions
First, get your campfire going. You want a good bed of hot coals, not a roaring flame. Let the fire burn down for about 30 minutes until you have a nice, even layer of glowing embers. This is crucial for even cooking.
While the fire is settling, cook your meat. In a cast iron skillet or a heavy-duty foil pan set on a camp stove or a grate over the fire, brown the ground beef. Break it up with a spoon until it is fully cooked and no longer pink. Drain off any excess fat. Stir in the taco seasoning and the 1/2 cup of water. Let it simmer for about 5 minutes until the liquid thickens into a rich, savory sauce. Take the pan off the heat and set it aside.
Now comes the assembly. You need a deep, heavy-duty disposable aluminum pan. Do not use a shallow one or the chips will spill everywhere. Start with a single layer of tortilla chips on the bottom of the pan. Do not crowd them. You want each chip to have room to be topped.
Sprinkle half of the seasoned meat over the chips. Then add half of the black beans, half of the corn, half of the green chiles, and half of the black olives. Finish this layer with a generous handful of the shredded cheese.
Repeat this process for a second layer. Add another layer of chips, then the remaining meat, beans, corn, chiles, olives, and finally all the remaining cheese. Make sure the top is completely covered with cheese. This creates a golden, bubbly crust that protects the chips from burning.
Cover the pan tightly with a piece of heavy-duty aluminum foil. Crimp the edges well to create a sealed packet. Place the foil packet onto a grill grate set about 6 to 8 inches above the hot coals. If you do not have a grate, you can carefully place the pan on a bed of hot coals, but check it more often.
Cook for 15 to 20 minutes. After 10 minutes, carefully lift the foil to peek. You want the cheese to be fully melted and bubbly, and the chips on the bottom should be warm but not burnt. If the cheese is not melting, leave the foil on and cook for another 5 minutes. Once the cheese is perfectly gooey, carefully remove the pan from the fire using heavy-duty oven mitts.
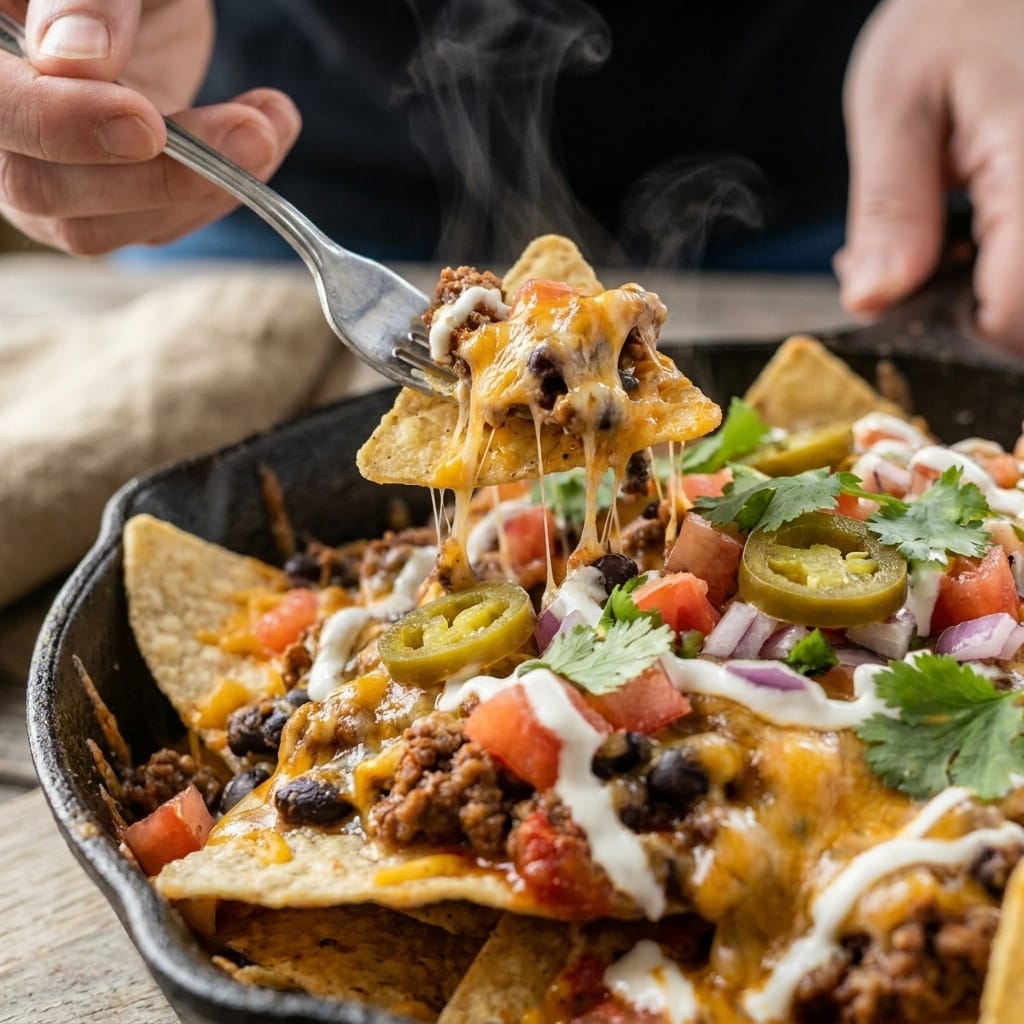
Let the pan rest for 2 minutes. Then, carefully peel back the foil. The steam will rush out, so keep your face away. Immediately top the hot nachos with the fresh diced tomato, red onion, cilantro, and sliced jalapeno. Drizzle the sour cream over the top in a zigzag pattern. Serve the Ultimate Campfire Nachos Loaded with Cheese and Fresh Toppings straight from the pan while everything is hot and melty.
Pro Tips for Success
The biggest mistake people make is using thin, flimsy tortilla chips. You need a thick, sturdy chip that can hold up to the weight of the toppings and the heat of the fire. Look for chips labeled “Restaurant Style” or “Extra Thick.” They are designed for heavy dipping and will not turn into sad, soggy crumbs.
Do not skip the step of building layers. If you just dump everything on top, the bottom chips will be bare and the top will be overloaded. By layering the meat, beans, and cheese between the chips, every single chip gets coated in flavor. This is the secret to a perfectly balanced bite.
Use indirect heat. Placing the foil pan directly on the hottest coals will burn the bottom before the cheese melts. By using a grill grate or a bed of slightly cooler coals, you create an oven-like environment. The heat circulates around the pan, melting the cheese evenly without scorching the chips. For more on the science of heat transfer, check out this Wikipedia article on heat transfer.
Servings and Timing
This recipe for Ultimate Campfire Nachos Loaded with Cheese and Fresh Toppings serves 4 to 6 people as a main dish or 8 to 10 as a hearty appetizer. The total time from start to finish is about 45 minutes, with 15 minutes of prep and 20 minutes of cooking time over the fire.

Variations and Substitutions
You can easily change this recipe to fit your tastes or what you have on hand. If you want a vegetarian version, skip the ground beef and double up on the black beans and corn. You could also add some sauteed bell peppers and onions for extra texture. For a spicier kick, use pepper jack cheese and leave the seeds in your jalapeno slices. If you are cooking at home, you can bake this in a 375 degree oven for 15 minutes instead of using a campfire. Just use a regular baking dish.
What to Serve With This
These nachos are a meal on their own, but they pair wonderfully with a cold side dish. A crisp Best Watermelon Feta Salad is the perfect refreshing contrast to the rich, cheesy nachos. For dessert, a warm Easy Peach Cobbler Dessert with a Golden Buttery Topping cooked in a dutch oven over the coals would be an incredible finish to the meal.
Storage and Reheating
These nachos are best eaten fresh out of the fire. Leftovers will not be the same because the chips will soften. If you do have leftovers, store them in an airtight container in the fridge for up to 2 days. To reheat, spread the nachos on a baking sheet and bake at 350 degrees for 5 to 7 minutes. This helps to crisp the chips back up a little. Do not use a microwave or you will end up with a soggy mess.
FAQs
Can I use a different type of meat?
Absolutely. Ground chicken or ground pork work very well. You could also use shredded rotisserie chicken. Just toss the shredded chicken with the taco seasoning and a splash of water before layering it into the nachos.
What if I forget to bring the foil?
If you do not have heavy-duty aluminum foil, you can use a cast iron skillet. Layer the chips and toppings directly in the skillet. Cover it with a lid or another piece of foil. Cook it over the fire just like you would the foil pan. The cast iron holds heat beautifully and gives the chips a nice, crispy bottom.
Can I make this in an oven instead of a campfire?
Yes, this recipe is very easy to adapt for the oven. Preheat your oven to 375 degrees. Assemble the nachos in a 9×13 inch baking dish. Bake uncovered for 10 to 12 minutes, or until the cheese is bubbly and golden. Then add your fresh toppings and serve.
What happens if I add the fresh toppings before cooking?
The fresh tomato, onion, and cilantro will wilt and become mushy if they are cooked. They will also release water, which makes the chips soggy. Always add the fresh toppings right after you pull the pan from the fire. The heat from the cheese will warm them slightly without ruining their texture.
Can I use pre-shredded cheese from a bag?
You can, but I recommend shredding your own cheese block. Pre-shredded cheese is coated with an anti-caking agent that prevents it from melting as smoothly. Freshly shredded cheese melts into a creamy, stretchy, and incredibly gooey layer that is perfect for these nachos.
Conclusion
Making the Ultimate Campfire Nachos Loaded with Cheese and Fresh Toppings has become a beloved tradition in my family. It is the dish that everyone looks forward to on our camping trips. I love watching the faces of my kids light up when I pull that steaming pan out of the fire. The combination of smoky, melty cheese, crunchy chips, and bright, fresh toppings is absolutely irresistible.
I hope you give this recipe a try on your next outdoor adventure. Do not be afraid to make a mess and get your hands dirty. That is part of the fun. Let me know in the comments how your nachos turned out. I would love to hear about your own campfire cooking triumphs.
 | ||||||||||||||||||||||||||||||||||||||||||||||||||||||||||