The Best Diploma Cookie Recipe for Your Special Day
Why You’ll Love This Recipe
I still remember the frantic search for the perfect treat to celebrate my niece’s graduation. Everything felt too generic or too complicated. That’s when I started testing this diploma cookie recipe. I wanted something that looked impressive but was actually forgiving for a home baker.
After about seven batches, I finally cracked the code. The dough needs to be just cool enough to hold its shape, but not so stiff that it cracks. This recipe is the result of all those trials. It solves the problem of wanting a show-stopping, themed cookie that actually tastes amazing, not just looks the part. For a deeper dive into the science of cookie textures, check out this article on the Maillard reaction which explains why we get those perfect golden edges.
Ingredients
- 1 cup unsalted butter, softened
- 1 cup granulated sugar
- 1 large egg
- 1 teaspoon vanilla extract
- 2 1/2 cups all-purpose flour
- 1/2 teaspoon baking powder
- 1/4 teaspoon salt
- 1/2 cup royal icing mix
- Water, as needed for icing
- Black food coloring gel
- Optional: edible gold dust for the seal
Step-by-Step Directions
First, get your butter and sugar into a large bowl. I use my stand mixer with the paddle attachment. Cream them together for a full three minutes until the mixture looks pale and fluffy. It should smell sweet and buttery.
Crack in your egg and add the vanilla. Mix on medium speed until everything is fully combined. Scrape down the sides of the bowl with a spatula. You want a smooth, unified batter.
In a separate bowl, whisk your flour, baking powder, and salt together. This step is important to evenly distribute the leavening agent. Slowly add the dry ingredients to the wet mixture, mixing on low. Stop as soon as the flour disappears. Overmixing here makes the diploma cookie tough.
Wrap the dough in plastic wrap and flatten it into a disc. Pop it in the fridge for at least one hour. Chilling the dough is non-negotiable. It prevents spreading and keeps the shape sharp.
Preheat your oven to 350 degrees F. Line two baking sheets with parchment paper.
Lightly flour your work surface. Roll the chilled dough out to about 1/4-inch thickness. Use a sharp, rectangular cookie cutter to cut out your diploma shapes. If you don’t have one, you can use a knife and a template.
Place the cutouts on the prepared baking sheets, leaving about an inch of space between each. Bake for 8 to 10 minutes. The edges should be just barely golden. The centers will look set but not brown.
Let them cool on the baking sheet for five minutes. Then transfer them to a wire rack to cool completely. Do not even think about icing them while they are warm. The icing will melt and run right off.
Make your royal icing according to the package directions. You want a stiff consistency for piping the borders. Divide the remaining icing and thin it with a few drops of water for flooding.
Outline each diploma cookie with the stiff icing. Then flood the inside with the thinner icing. Use a toothpick to spread it into the corners. Let this base layer dry completely for several hours.
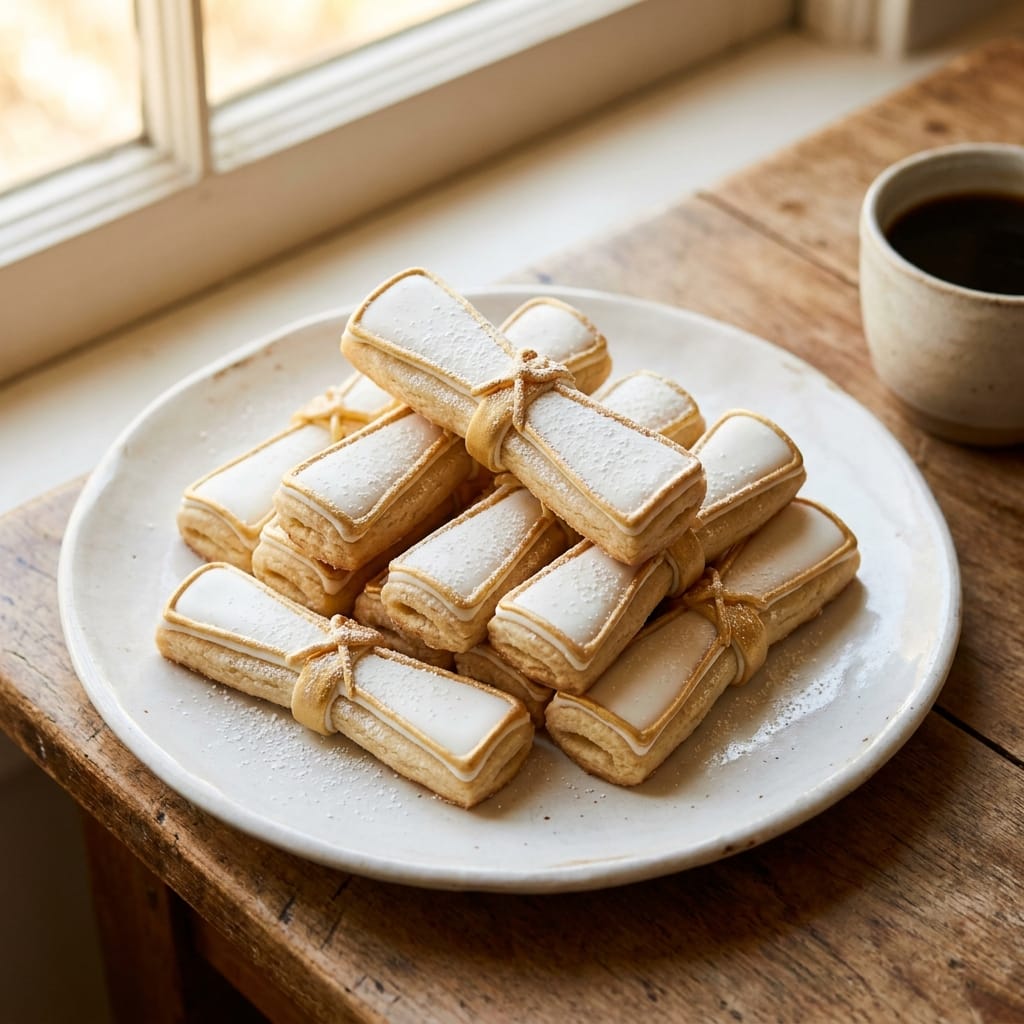
Once dry, use the stiff black icing to pipe a small line for the text or a simple “2024” on each cookie. For an authentic touch, I add a tiny dot of gold dust to represent a seal.
Pro Tips for Success
Do not skip chilling the dough. I made this mistake on batch three. The cookies spread into blobs and looked nothing like a diploma. The cold butter creates steam in the oven, which gives you a cleaner edge.
Use a food scale for your flour. Scooping with a measuring cup packs the flour too tightly. This leads to a dry, crumbly diploma cookie. A scale gives you consistent results every time.
Let the base layer of icing dry completely. I usually wait overnight. If you rush this step, the black piping will bleed into the white, ruining your clean lines. For more on working with royal icing, you can read about royal icing techniques on Wikipedia.
Servings and Timing
This recipe makes about 24 diploma cookies, depending on the size of your cutter. The total time is about 3 hours, which includes 1 hour of chilling and 2 hours of drying time for the icing. Active prep time is only about 30 minutes.
Variations and Substitutions
If you want a chocolate version, swap out 1/4 cup of the flour for unsweetened cocoa powder. The flavor is rich and the dark color looks great against gold accents. For a gluten-free option, use a 1-to-1 gluten-free baking flour blend. Just be aware the dough will be a bit more delicate to roll.
You can also flavor the icing. A drop of lemon or almond extract in the royal icing adds a lovely twist. If you are short on time, skip the flooding step. Just pipe a simple border and leave the center bare for a rustic look.
What to Serve With This
These diploma cookies are perfect for a graduation party spread. I love serving them alongside my easy punch recipe for a refreshing drink. They also pair beautifully with a chocolate dipped strawberries platter for a sweet and elegant touch.
Storage and Reheating
Store your finished diploma cookies in an airtight container at room temperature. Place them in a single layer with parchment paper between each layer. They will stay fresh for up to one week. Do not refrigerate them, as moisture can make the icing soft and sticky. You cannot reheat these cookies, as the icing will melt.
FAQs
My dough is too sticky to roll out. What did I do wrong?
This usually means your dough wasn’t chilled long enough. Pop it back in the freezer for 15 minutes. You can also dust your rolling pin and work surface with a little extra flour.
Can I freeze the unbaked cookie dough?
Absolutely. Wrap the disc of dough tightly in plastic wrap and then foil. Freeze for up to three months. Thaw it in the fridge overnight before rolling and cutting.
The edges of my diploma cookie burned before the center was done.
Your oven might run hot. I recommend using an oven thermometer to check the actual temperature. Also, make sure your baking sheets are not too dark, as dark pans absorb more heat.
How do I get the icing to be perfectly smooth and shiny?
The key is the consistency of your flood icing. It should flow like honey. When you drizzle it back into the bowl, the ribbon should disappear into the surface within about ten seconds.
My royal icing is too thick. Can I fix it?
Yes, just add water one drop at a time and stir gently. If you add too much water and it gets too thin, you can stir in a tiny bit more powdered sugar to thicken it back up.
What if I don’t have a rectangular cookie cutter?
You can use a pizza cutter and a ruler. Roll out the dough, then cut straight lines to form rectangles. This method is actually faster and gives you perfectly uniform shapes.

Conclusion
I hope you give this diploma cookie recipe a try for your next celebration. They are so much fun to make and even more fun to give. The look on people’s faces when they see a cookie that looks like a real diploma is priceless. Please let me know how yours turn out. I love hearing about your baking adventures.
 | ||||||||||||||||||||||||||||||||||||||||||||||||||||||||||